CMS Tools
There are a variety of tools available in Modern Campus CMS to make managing your webpages easier.
Spell Check
Before publishing a webpage, you should always spell check. There are two ways to do this in TU’s content management system:
- Toolbar — Clicking on the spell check button will show misspellings underlined in red. Right-click on the underlined words to select the correct spelling.
- Page check spell check (only available to Content Owners) — When publishing a page, the page check will show misspellings in a list. You will need to cancel the publish and go back into page edit mode to find and fix the misspelled words.
Reminders
You can set two types of reminders on a webpage — scheduled or stale.
Scheduled Reminders
A scheduled reminder is used for specific dates and times when a reminder message should be sent. For example, if tuition increases at a specific time every year, a scheduled reminder may be set on a page about tuition for the week prior to the tuition change. To create a scheduled reminder:

Use the “Content” drop down menu in the Global Navigation Toolbar and then select “Pages” to open the file view of the directory. Go the far right of the file row for the file you wish to add a scheduled reminder. Select the “More Actions” menu.

Under the “Edit” drop-down menu you will see several file options. (Please note that what you see in the drop-down menu varies by permissions level. This screen shot represents an administrator’s view.) Select “Reminders” and the “Reminders Form” will open.

The “Scheduled Reminders” is the first tab; “Stale Reminders” is the second tab. Both tabs create an email that you can schedule to have sent to your inbox on a specific date. Make sure you “Enable” the form and then fill out the content as appropriate and then click “Save.”
Stale Reminders
A stale reminder is sent to make sure a page is being updated periodically — not at a set date and time. For example, you may want to send a stale reminder on your webpages to make sure fresh content is added every 90 days.
Scheduled Publish
Content Owners have the ability to set pages to publish at a later date. You may want to use this feature if something needs to change on your website over the weekend or while you're on vacation.
Versioning
Each time a webpage is published, an automatic version is created. You may also save a version manually. Versions may be used to switch between different revisions of a webpage. For example, at the beginning of each fall term you may want to revert back to the “fall” version of your Contact Us page to display your fall term hours. Here’ the process:
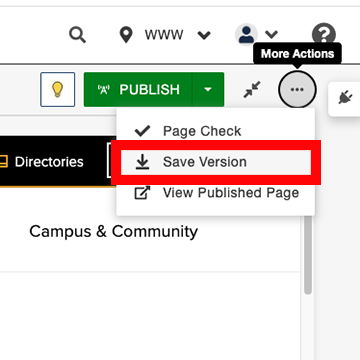
First, you will want to make certain that the webpage you want to save as a specific version is edited and spell-checked and without errors. Once you save a version of a page you cannout delete it. Having multiple saved versions (some with errors ans some without can be confusing). When the page is ready, go to the More Actions menu to the right of the publish/submit button and select “Save Version.”
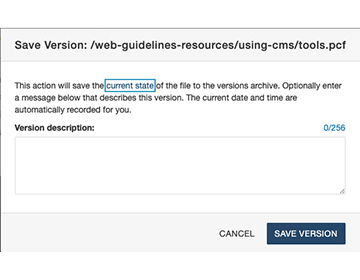
You will be prompted by a pop-up menu to name your webpage version. Your chosen name should be specific enough that you understand the content that is saved on the page. For example, let's say you have a series of events that happens one week of the year — an educational symposium. If you are preparing a version of the webpage that you will revert back to after the events have happened you might call it “general information version” and if you want to also save a version with the events saved (so you can easily recall the formatting and design of the page) you might call it “events version.”
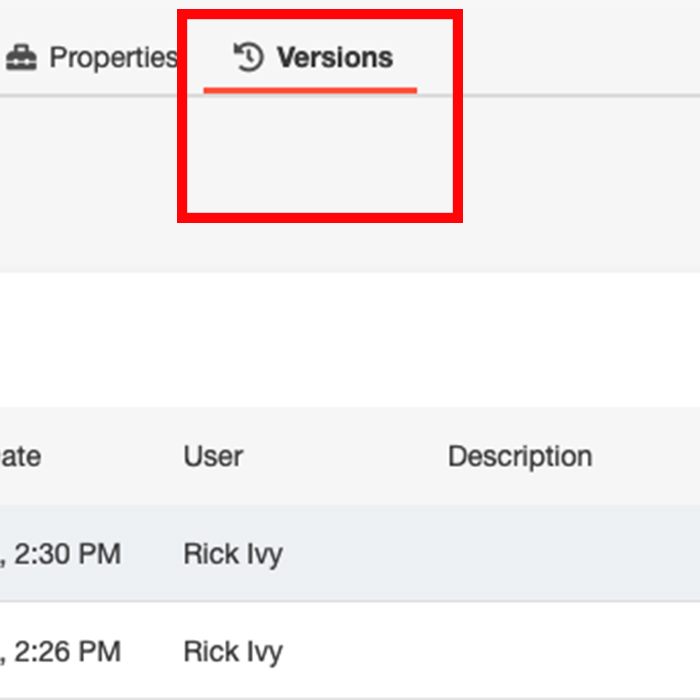
Saved page versions can be accessed by clicking the “Versions” tab in the page-level navigation. From this tab you will be able to see a list of previously published webpage versions and any page versions that you have named with a page description.
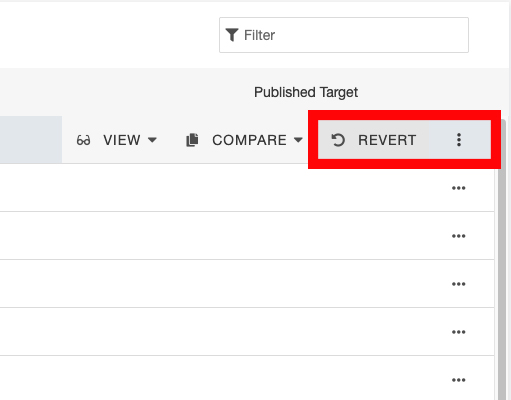
When you are ready to revert the page back to a specific page version, you will do so by clicking the menu to the far right. After selecting the menu, you will see options for viewing a previous page version, comparing the previous version with the current version and lastly reverting the current version to the selected previous version. To revert the page, select ”Revert.”